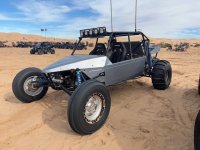
I figured I would make a rough build thread for my car since I have changed a lot on this car in almost 4 years of ownership. I bought this car in January 2021 with a J35 Honda and 091 trans. The car was originally built in 2006 with a turbo VW and 091. It was Wuerth's "Stage 1" Chassis.
In the 4 years I've owned it, I have had multiple different set ups. Turbo J35 with 2D, and the LS1/LS6 and 2D. Last Thanksgiving, I blew up the 2D i had, and had Rich Roberts from Action Auto Racing Gearboxes build me a fresh Deco case 2D, which is been great!
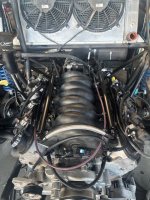
The motor is an LS6 bottom end, with early 853 LS1 heads. I bought the motor in pieces from Lee Finke at Raceshock. It was his spare race motor for his class 1 buggy. Lee was my dads next door neighbor for years, and taught me so much about suspension/shock set ups and tuning. (RIP Lee).
I assembled the motor in my spare bedroom, with the addition of a Summit 8708 Cam. Powered by a Holley Terminator X engine management. So far I love the LS! 2 seasons in on it so far. The turbo Honda might have been faster up top, but cant beat the instant TQ of the LS!
Here's a rough timeline of what I have done the past 2 years.
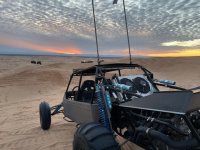
First, built the LS, as well as a new engine cage for the car! I liked the style/shape of the S&S car's engine cages, so did something somewhat similar to that shape wise, and added the 1" cross bars behind the engine just for styling! Added another diagonal bar on the side of the engine cage for additional gearbox/engine bracing! (headers pictured in these photos didn't end up being used due to fitment issue)
View attachment 128934
View attachment 128935
View attachment 128936
View attachment 128937
View attachment 128938
Here's a few more pics of the car after i painted the engine cage:
View attachment 128939
View attachment 128940
View attachment 128941
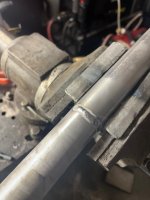
Almost as soon as I put the LS in the car, the pivot tube cracked right by the inner trailing arm mounts in the exact same spot on both sides. So reinforced that area with some triangle gussets! (some of the areas were hard to reach with the TIG torch, so a couple areas arent as pretty as others

) Since this, there have been no chassis structural issues at all!
View attachment 128942
View attachment 128943
View attachment 128944
View attachment 128945
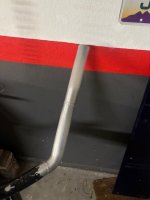
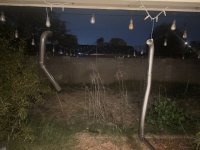
Next project after this was building a 2 to 1 exhaust, and wow does the car sound so much better, and seems to run better! Made it out of mild steel exhaust tubing, using 308L filler!
View attachment 128946
View attachment 128947
Summer of 2023,
@ranman5608 cut me a new roof with a break at the back to match the original Wuerth trunk! Powder coated it red, and it matches pretty good!
View attachment 128948
View attachment 128949
View attachment 128950
Next major project was the addition of rear bypasses.
@lincster sold me the King 2.5x14 triple bypasses that came from his Sandtrix F5 as he was upgrading! Being that they were the same size as my King 2.5x14 rear coilovers, i decided to mount them side by side, which made things much easier. (Found paint to match the added areas, too)
A whole year later, i still need to pull the coilovers apart and remove some valving. Lee and myself had the car dialed in pretty well with no bypasses, so the addition of the bypasses meant too much valving in the rear. Planning to do a coil carrier set up. I will be changing the rear c/o valving prior to Thanksgiving 2024 weekend.
View attachment 128951
View attachment 128952
View attachment 128953
View attachment 128954
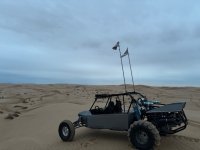
Here's a few pics from the 2023 season, removed the wrap the car had on it. Much cleaner! (
@Funco4JM car in the background!)
View attachment 128955
View attachment 128956
View attachment 128957
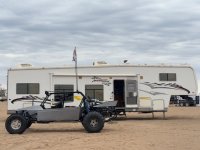
Going into the 2024-2025 season was FULL of tin work and other random projects. My buddy Kurtis built me a hood and dash for the car, and i decided to convert the car to a 2 seater and put a 22 gallon RCI fuel cell in place of the rear seats. Reason for this was to move some weight forward. When i put the LS/2D in, i probably placed the motor/trans slightly too far back, although i set it up to where at full droop, the trans CV center and hub center line were perfectly in line, which is the "correct" way to do it, however made the car somewhat back heavy. With the weight further, and the addition of 10.50 front tires, the car handles like a dream! (i traded my 8.50's and 15's for 10.50's and 17's). I then made a fuel cell cover plate with doors to access the electronics (which i relocated), The fuel cell fill cap and fittings, and the far door on passenger side for storage! Here's some pics of everything:
Early stages of electronics relocation
View attachment 128958
Fuel cell of choice
View attachment 128959
Plate that i made: (will do some clean up when i change the color this off season)
View attachment 128960
View attachment 128961
Finally, here's some hood and dash pics. I'm only allowed 30 pics per post, so posting vets day 2024 pics after this!
View attachment 128962
After this season, the car is going to get a full tear down, color change, 2" hallows, and some other stuff!